Floor tiles are a great way to add a touch of elegance to your property. You can choose from a variety of tile colours, shapes, and sizes according to your style and preferences. If your backyard isn’t vast, regular tile flooring might look better. Nonetheless, installing ceramic tile is the ideal choice for your outdoor patio. Besides, you don’t need a contractor for tiling on concrete floors. You can easily lay them as long as you take the time to level a concrete floor, add a membrane, and arrange the tiles correctly. Additionally, a concrete bed is an excellent surface to work on if it is properly laid and prepared. It offers fewer issues and has a long lifespan, which also ensures that you can smoothly install the tiles without experiencing any hassle.
Steps to Install Floor Tiles on Concrete Flooring
a) Prepare the Concrete Floor
For tiling a floor on concrete, you have to prepare the space. You could eventually need to remove the tiles and start over if you don’t prepare the floor properly. We mean more than just sweeping and scrubbing the floor when we talk about preparation, so let’s discuss the steps involved in preparing the floor for tiling.
Measure the Room & Choose a Pattern
To determine the number of tiles required to cover the entire floor, measure the area of the room. Next, choose the pattern for the tiles. The way your tiles are laid out has a tremendous impact on how your floor looks. You have the option of arranging your tiles vertically, horizontally, diagonally, or even combining various sizes and orientations.
To prevent cutting huge or oddly shaped tiles into tiny pieces, it is advisable to place them parallel to the longest wall. Additionally, you can arrange the tiles in a herringbone, chevron, or diagonal pattern for a contemporary appearance. The room seems broader when the tiles are laid horizontally and narrower when they are laid vertically.
Choose the Correct Thinset Mortar
The kind of thin-set mortar you use depends on the dimensions and type of tiles. They can be installed using both modified and unmodified thin-set mortar. Most tile installations may be completed with unmodified mortar except when heavier tiles require a stronger bond. Moreover, you should add latex or polymer admixture to unmodified mortar to improve adhesion and bond strength. Plus, pick a mortar that does not shrink after curing if you are using large, heavy tiles.
Clean the Floor
It is important to clean the floor to guarantee that the mortar will cling to the concrete floor. So, you must mop the floor and use a suitable amount of water to moisten the surface. Next, take a scrub brush and a solution of degreasing cleanser and warm water. Following the manufacturer’s instructions, mix the product with water and give the floor a thorough cleaning and a water rinse. In addition, keep in mind that the duration of the mixture’s contact with the concrete floor differs depending on the product.
Furthermore, check for any holes or cracks after cleaning. If they are present, smooth and level them by filling them with concrete patching compound, and sanding.
Select your Starting Point
Choosing the starting point is the next step in the preparation process. To reduce the number of little pieces that are cut when utilising large or irregularly shaped tiles, it is recommended to begin from the centre of the room and work your way outward. This will enable you to arrange the tiles uniformly and create a stunning effect.
However, if the room contains a fireplace or other architectural element, you may start tiling around it to make a bold and attractive appearance. Well, this indicates that the conventional rule, which is to start from the centre, may not always work for you. Also, the entrances must be taken into account when tiling on concrete floors.
Dry Fit the Tiles
We advise dry-fitting the tiles after you’ve chosen the starting point for the tile installation. This will make it easier for you to envision how the floor will seem once the tiles are laid. If you notice any problems or find the floor’s general design unappealing, make all necessary modifications, such as adjusting the pattern.
b) Install the Tiles
The next stage is to install the tiles by following a series of steps.
Lay the Tiles
Thoroughly read these tips and implement them to lay the tiles properly:
- As directed by the manufacturer, use a mixing paddle to combine the mortar with water.
- Wipe down any dust or debris from the back of the tiles using a sponge or moist cloth. By doing so, you can make sure that the tile doesn’t absorb the thin-set water.
- Using the trowel’s notched side, comb it after applying a layer of thin-set mortar to the concrete surface using the trowel’s flat side.
- Known as “tile back buttering,” this process involves applying mortar to the back of the tiles. After installation, the tiles won’t move since they strengthen the adhesive and fill in any gaps.
- Carefully place the first tile in its designated spot on the mortar.
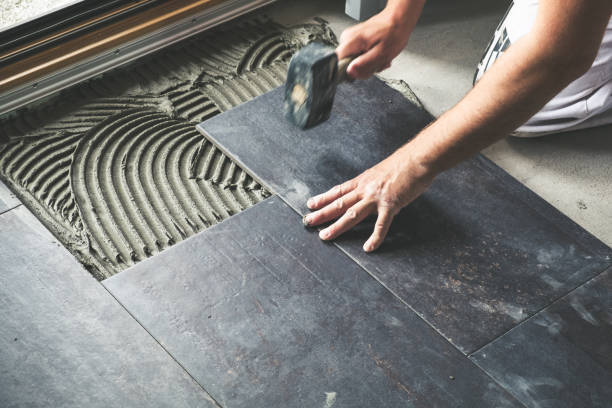
- As you lay the tile, make sure it is leveled and spaced evenly by using a rubber mallet. If the surface is uneven, take the mallet and tap the higher part.
- Ensure you leave enough space between the tiles for grout lines by placing spacers on both sides of the tile. Also, do not forget to insert leveling clips into the spacer’s hole above the tiles.
- Now, simply arrange the tiles outward from the corner using the previously described steps.
- After the mortar has cured for 20-30 minutes, remove the spacers. Remember that early removal will cause the tiles to move, while late removal will result in the spacers becoming stuck.
- Let the mortar cure. This usually takes 24-48 hours.
Grout the Tiles
Grout the spaces between the tiles after you’ve finished laying the tiles and the thin-set mortar has fully dried. Follow these steps:
- First and foremost, remove the dried mortar from the grout lines with a utility knife. Next, dry vacuum the entire floor, including the grout lines.
- According to the manufacturer’s guidelines, mix the grout with water.
- Using a grout float, evenly distribute the grout over the tiles.
- Using a moist sponge, remove any extra grout and let it dry.
- Clean any leftover grout from the tile surface and sweep the floor afterward. To protect the grout lines from moisture and stains, add a sealer.
Protect the Tiles
Protecting the tile floor from scratches is crucial, which means that you have to cover the floor with contractor paper. These sheets are available in 36-48-inch-wide rolls. Tape the papers together to form one large length of carpet. Instead of using little amounts of tape to seal the paper joints, use tape all the way across to ensure longer-lasting protection for your floor.
Bottom Line
To someone with no prior knowledge and experience, tiling a floor on concrete may appear like an overwhelming undertaking. However, you can accomplish it efficiently if you follow our step-by-step guide. Once you install the tiles, you must perform routine maintenance and cleaning by using warm water and a gentle cleaner. This will not only make them look brighter and more beautiful but also prolong their lifespan, ultimately making your investment worthwhile.
Do you need mix onsite concrete for your project? Contact our representatives at Pro-Mix Concrete to purchase the highest-quality concrete at an affordable cost!
Related article: subsellkaro